

Table of Contents
- What to Expect at a Beginner Jewelry Making Workshop in Rehoboth Beach
- Essential Jewelry Making Tools for Beginners
- How Long Is a Jewelry Making Workshop Duration?
- Class Schedule, Pricing, and Registration Details
- Techniques You Will Learn: From Bead Stringing to Metalsmithing
- Skill Progression: Your Roadmap from First Class to Confident Maker
- Safety, Studio Etiquette, and Local Maker Community
- Conclusion
- Frequently Asked Questions
Last Updated: September 13, 2026
What to Expect at a Beginner Jewelry Making Workshop in Rehoboth Beach
Beginner jewelry making workshops in Rehoboth Beach give you a finished piece, a new skill, and a low-pressure afternoon in a working studio, and Most run one to three hours, cap enrollment at small numbers, and supply every tool you need (craftcouncil.org). This guide from Frijja covers what each session involves, what you'll spend, and how to keep building after class ends.
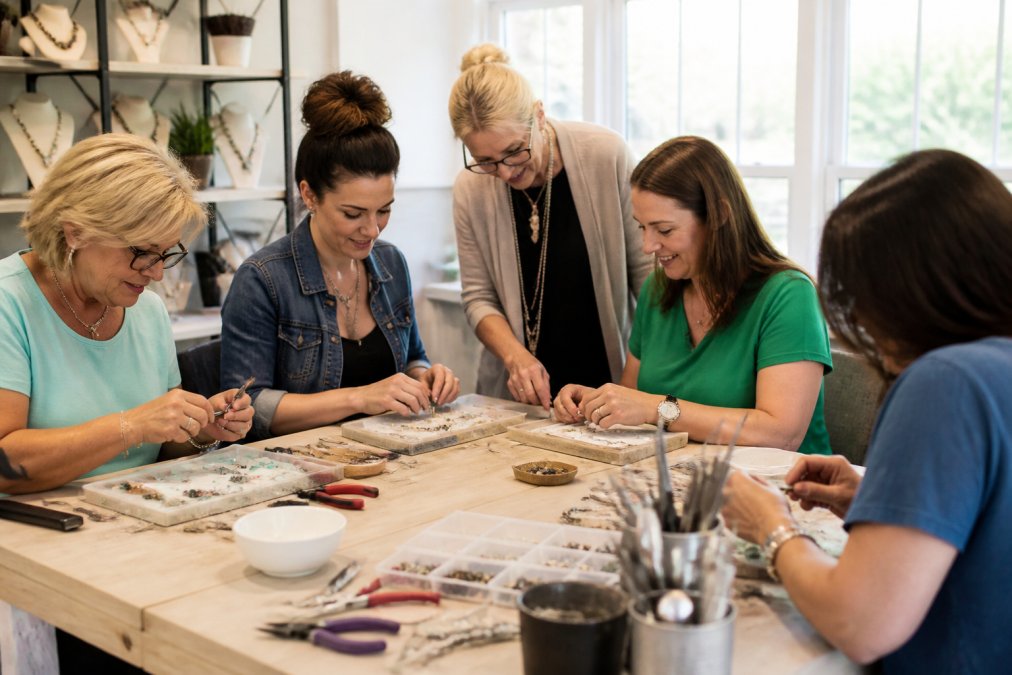
Hands-On Instruction and Studio Environment
The format is hands-on from the first ten minutes: an instructor demonstrates a technique, then you try it yourself. Nobody lectures for an hour first.
A working studio looks and sounds different from a classroom, the snap of flush cutters, the hum of a polishing wheel, the tap of a hammer on a steel block. Expect a shared table, good lighting, and a tray for your tools.
What most guides miss is how much the studio environment does for your learning. Standing at a proper bench with the right pliers beats watching a video at your kitchen table every time.
Essential Jewelry Making Tools for Beginners
Jewelry making tools for beginners fall into three groups: cutting, shaping, and finishing. You do not need to own any to take a first class, just recognize them and know which are worth buying later.
- Cutting: flush cutters, wire snips, jeweler's saw
- Shaping: round-nose pliers, chain-nose pliers, nylon-jaw pliers, mandrels
- Finishing: files, sandpaper in several grits, polishing cloth, tumbler
Bead stringing adds a few items: crimping pliers, beading wire, and a bead board to lay out your pattern before you commit to it.
What the Studio Provides vs. What You Bring
Most beginner workshops provide all tools and materials as part of your tuition, the single biggest reason to take a class before buying anything. You get to test a $40 pair of pliers before deciding whether you actually like wire work.
Bring yourself, your glasses if you wear them, and a notebook. Some studios ask for a small towel or apron, and a few sell tool kits at the end of class, a sensible way to start your own bench without guessing.
Equipment Rental vs. Purchase: What Beginners Should Actually Do
Rent or borrow first. Many studios rent bench space by the hour and lend tools to students who have taken at least one class. A rented bench hour typically costs less than a single mid-range tool and lets you try a jeweler's saw or flex shaft before committing (ganoksin.com). Open bench nights are the cheapest way to keep practicing between classes.
Buy in this order, not all at once.
- Safety first (under $40 total): safety glasses, a dust mask, and a bench brush. These are non-negotiable and cheap.
- One technique's tools: if you loved wire wrapping, buy round-nose pliers, chain-nose pliers, and flush cutters. If you loved bead stringing, buy crimping pliers and a bead board. Do not buy both sets.
- A task lamp and a mat: good light and a surface that catches small parts will improve your work more than any single tool.
- Power tools and torches last: a flex shaft or soldering setup is a real investment and should wait until you have taken a metalsmithing class and know you will keep going.
What not to buy. Avoid prepackaged "200-piece jewelry kits" sold online. They bundle low-quality pliers with beads you will not use, and the pliers often have rough jaws that mar wire.
Where to buy. Local bead shops and jewelry supply houses let you hold a tool before buying, which matters more than most beginners expect. National retailers and craft chains carry reliable starter pliers, and many offer student discounts with a class receipt.
How Long Is a Jewelry Making Workshop Duration?
A typical beginner jewelry making workshop duration is one to three hours, with most single-project classes landing at about two hours. A charm bracelet or beaded necklace class usually finishes in 90 minutes to two hours, including setup and cleanup. Metalsmithing sessions with soldering run longer, often three hours, because sawing, filing, and finishing each take real time.
Project complexity drives the schedule more than anything else. Here is how duration maps to project type:
| Project Type | Typical Length | What You Finish |
|---|---|---|
| Bead stringing | 60-90 minutes | Beaded bracelet or necklace |
| Wire wrapping | 90-120 minutes | Wrapped pendant or ring |
| Charm bracelet | 1-2 hours | Charm bracelet with clasp |
| Basic soldering | 2-3 hours | Soldered band or pendant |
| Stone setting | 3+ hours | Bezel-set cabochon piece |
If you are booking around other plans, add 15 minutes on each end. Classes rarely start exactly on time, and cleanup is part of the session.
Class Schedule, Pricing, and Registration Details
Schedules vary by studio, but most offer weekend afternoons and a few weekday evenings. Registration is usually online, and weekend slots go fast during the summer season.
Pricing depends on the project and materials. A single-session beginner class with all supplies included typically runs in the range of a nice dinner out; multi-week courses cost more because you pay for instruction hours plus materials across several sessions.
At Frijja, the Sea Life Charm Bracelet Class on April 12, 2026 is a good example of the format. It runs from 2:00pm, lasts one hour, costs $65.00, and is capped at 15 people. You build a stainless steel charm bracelet, a material that does not tarnish, so beachgoers do not have to worry about discoloration or rusting. It is hypoallergenic, and the class includes an extra charm engraved with "handmade."

When you register, confirm three things: whether materials are included, the cancellation policy, and the class size cap. A cap of 12 to 15 people keeps instruction personal. Anything above 20 and you will spend more time waiting for the instructor than working.
Private Lessons vs. Group Classes
Private lessons cost more per hour but move at your pace, suiting anyone with a specific project, a deadline gift, or a schedule that will not fit a fixed class time.
Group classes cost less, add a social element, and show you how others solve the same problem. For a true beginner, a group class is usually the better first step: you learn the fundamentals, see three or four approaches to the same technique, and find out whether you want to go deeper before paying for one-on-one time.
A common mistake is booking private instruction for a skill you have never tried, you spend the first half on basics you could have learned in a group setting for a fraction of the cost.
Techniques You Will Learn: From Bead Stringing to Metalsmithing
Most beginner curricula start with bead stringing and wire wrapping, then move to fabrication techniques like sawing, soldering, and polishing. Stone setting comes last because it builds on everything before it.
Bead stringing teaches tension, pattern layout, and crimping, the fastest route to a wearable finished piece.
Wire wrapping introduces pliers control and how metal behaves when bent. It is forgiving, making it ideal for a first attempt at custom jewelry.
Metalsmithing covers sawing, filing, soldering, and finishing, where craftsmanship starts to feel real and safety habits matter most.
Stone setting is the advanced step: cut a seat, fit the stone, and secure it without cracking anything. Most beginners need several sessions before this clicks.
The Manufacture Horlogère Suisse and jewelry training resources outline the same progression used in formal jewelry programs, and beginner workshops compress the first two stages into a single sitting.
Skill Progression: Your Roadmap from First Class to Confident Maker
Skill progression in jewelry making follows a predictable arc, and knowing it stops you from signing up for the wrong class:
- First class (months 0-1): Finish one simple project. Learn tool names and basic safety.
- Second and third classes (months 1-3): Repeat one technique until it feels automatic. Try a new material.
- Independent practice (months 3-6): Work at home with a starter kit. Follow written instructions without an instructor.
- Intermediate techniques (months 6-12): Add soldering or stone setting. Accept that your first attempts will be rough.
- Confident maker (year 1+): Design your own pieces, troubleshoot your own mistakes, and choose materials deliberately.
The jump from step two to step three is where most people stall. They take a class, love it, and never practice at home because they have not set up a workspace. A small bench, a task lamp, and one tray of tools solves that.
Safety, Studio Etiquette, and Local Maker Community
Safety in a jewelry studio comes down to a few habits that map directly to the techniques you are learning. Knowing which hazard belongs to which skill keeps you calm instead of anxious.
Safety by Technique
Bead stringing and wire wrapping. The main risks are small and sharp. Beading wire can whip when cut, so point flush cutters away from your face and hold the wire end with your free hand. Crimp beads and jump rings are a choking hazard for children, keep them in a tray, not loose on the table.
Sawing and filing. Metal filings are sharp and get everywhere. Wear safety glasses, and never blow filings off the bench, they can lodge in your eye. Use a bench brush and dustpan.
Soldering. This is where safety habits matter most. Tie back long hair, roll up sleeves, and never touch a torch until an instructor has walked you through it. Ventilation is not optional, soldering produces fumes, and most studios have a hood or open-window setup. Know where the fire extinguisher is before you pick up the torch.
Polishing. A polishing wheel spins fast and will grab loose hair, sleeves, or dangling jewelry. Pull long hair back, remove bracelets and necklaces, and keep fingers clear of the wheel's contact point.
Studio Etiquette: The Unwritten Rules
Studio etiquette is simpler than people expect, but a few rules are universal.
- Clean your bench when you finish. Sweep filings into the trash, not the sink, metal shavings clog drains.
- Put tools back where you found them. The next student should not have to hunt for the chain-nose pliers.
- Ask before borrowing personal tools. Instructor and student tools are often personal property, and pliers that have been shaped to someone's hand are not interchangeable.
- Do not use a torch or power tool without a check-out. Most studios require a quick sign-off before you use equipment independently.
- Respect shared materials. If a studio provides silver or stones by weight, weigh what you use and record it.
The Local Maker Community
The maker community is the part most beginners overlook, and it is where the long-term value of a workshop lives. Workshops put you in a room with people who share your interest, and those relationships outlast the class.
Studios in beach towns run on a seasonal rhythm: summer brings tourists and short single-session classes, while the shoulder seasons bring multi-week courses and open bench nights for locals. To keep going after your first class, ask about:
- Open bench nights, where you pay a small hourly fee to use studio tools and work on your own projects alongside other makers.
- Critique sessions or maker meetups, where members bring finished pieces and get feedback.
- Seasonal markets and craft fairs, where studio members sell their work. Even if you are not ready to sell, visiting shows you what is possible and introduces you to the people who make it.
- Supply swaps or group buys, where makers pool orders to get better prices on wire, stones, and findings.
Conclusion
Signing up for your first class is the hard part, and the rest is practice. Frijja carries the handcrafted end of that journey, with sterling silver jewelry, home decor, and limited antiques made by local artisans, plus beginner classes like the Sea Life Charm Bracelet Class that start you at $65.00 with every tool and material provided. Browse the full collection and the workshop calendar, then book a seat. Get started with Frijja and leave with a piece you made yourself.
Frequently Asked Questions
How do I find beginner jewelry making workshops in Rehoboth Beach?
Start by checking local boutique shops and art studios that host classes, like Frijja's Sea Life Charm Bracelet Class on April 12, 2026. Look for sessions labeled beginner-friendly with small class sizes (often capped at 15 people). Ask about the project, materials provided, and whether you need any prior experience. Many workshops are listed on shop websites or social media, and you can call ahead to confirm availability. Booking early helps since popular weekend sessions fill up quickly.
What tools do I need for a beginner jewelry making class?
Most beginner workshops provide all essential jewelry making tools for beginners, including round-nose pliers, flat-nose pliers, wire cutters, and bead scoops. You typically only need to bring yourself and maybe reading glasses if you need them for close work. Some studios ask you to wear closed-toe shoes and tie back long hair for safety.
How long are typical jewelry making workshops for beginners?
Beginner jewelry making workshop duration usually runs 1.5 to 3 hours, depending on the project. A simple beaded bracelet or charm bracelet class often takes about 2 hours, including instruction and finishing time. More involved projects like soldering a silver ring can take 3 to 4 hours or span two sessions. Frijja's Sea Life Charm Bracelet Class is 1 hour, ideal for first-timers. Always check the stated session length before registering so you can plan your day.
Can I learn metalsmithing in local jewelry workshops?
Yes, many local studios offer introductory metalsmithing as part of their beginner curriculum, covering soldering, sawing, filing, and polishing. These skills are usually taught in multi-week courses or full-day intensives rather than short single sessions. If you are new, start with a wire wrapping or bead stringing class to build hand strength and comfort with tools, then move to a metalsmithing workshop. Check that the studio provides ventilation and safety gear, and ask about the student-to-instructor ratio before enrolling.
0 comentarios